Adding a timestamp to a Digital Signature in Microsoft Office
Why would you want to timestamp your signature?
|
|
Attest to "when" a digital file was signed |
|
|
|
|
A digital signature provides who signed the digital file. A timestamp of that digital signature provides when the digital file was signed. These are two basic ingredients to properly execute e-commerce transactions and other business agreements. It is like signing a document before a notary - the notary can testify that you appeared before them on a given day to sign a document. |
|
|
In the event your PKI private key is compromised |
|
|
|
|
If your private key were to be revealed, then others could sign data files as yourself. This would not compromise all data files you ever signed with that key if you also timestamped those previous signatures. Because DigiStamp countersigns the data files, those signatures created before the private key was compromised are still valid.As a general practice, to maintain the veracity of digital signatures you accept, they should be timestamped to avoid the other party from later stating that their private key was revealed; and therefore, any of their signatures with that key might be a forgery.Second is that the process to create a digital signature involves using your secret, private, signing key. There is risk that your private key will be stolen or compromised. It is important that you can distinguish the documents that you signed with your private key from those that were signed after the key was compromised. If you timestamp all your signatures, then those signatures created after the compromise can be distinguished. It is important in this process to notify the Certificate Authority that the key was compromised. This process can be compared to calling a credit card company to inform them when your credit card was lost or stolen. Once informed, the credit card company can identify inappropriate charges. |
|
|
Create a binding receipt |
|
|
|
|
When your signed documents are sent to a trading partner, ask for an immediate receipt. A receipt is the receiving party’s timestamped signature of the document you sent, which is strong evidence that they had receipt of the document at the specified time. |
There is a one-time setup of Microsoft Office to enable timestamping, described below. In summary:
-
Update Registry entries to tell Microsoft Office to retrieve a timestamp
-
Import DigiStamp Root certificates
-
Update your DigiStamp account to allow "IP-based Authentication"
The instructions below are for the individual user. If you are using Microsoft Active Directory we have instructions to help you push these changes to your network users.
Setup requirement: your digital signature
Microsoft Office software has built-in the capability to create digital signatures (the screen capture image below demonstrates). It is a little complex, for example you need to get personal, digital-signing credentials. Microsoft is your best source of "how to" on this subject. Please do an Internet search for "Add or remove a digital signature in Office files" and look for links to https://support.office.com/ Editor's details: we would give you direct links, but the Microsoft support site is designed to prevent that.
You need a CA to issue your signing certificate described here.
How do I timestamp a signature?
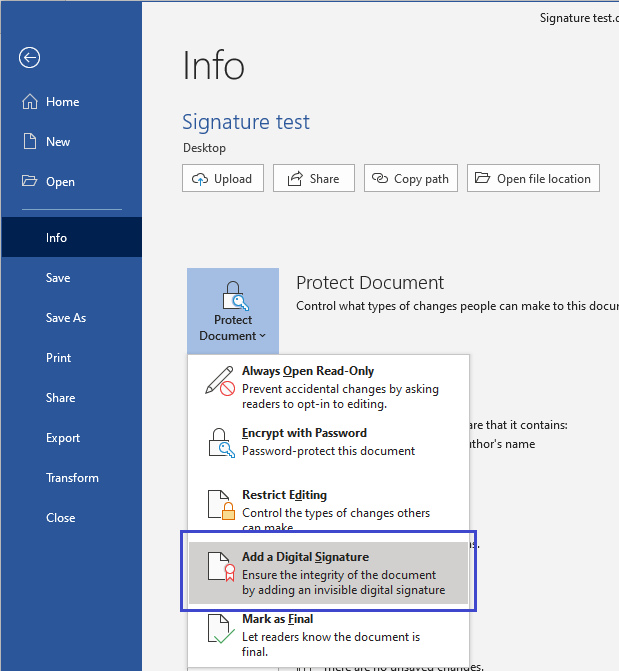
The timestamp is created when you protect the Office document with your digital signature. This is done as shown in the graphic below, navigate the menu option < File >, < Protect Document >, < Add a Digital Signature >
How do I know the signature was timestamped?
In Office navigate the menu option < File >, < Protect Document >, < Add a Digital Signature > you navigate under the “File” tab to “View Signature” then right click on the signature for “Signature Details.
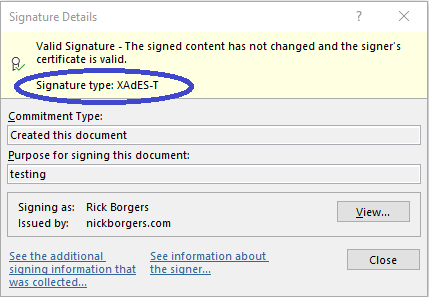
It should say as shown above in the blue circle “XAdES-T” to confirm the signature is timestamped. These values also confirm that there is a timestamp: XAdES-C XAdES-X XAdES-X-L
Can I view the details of the timestamp?
Regretfully, no. Microsoft has not provided a way for us to examine the details or export the signature or timestamp. But, by observing the verify process in detailed system logs, Office does verify the signatures and timestamps; specifically, as described in the introduction related to when your signing certificate expires.
Setup: Registry entries to tell MS Office to retrieve a timestamp
You can perform the manual process described below using REGEDIT. Or, you can download this file, inspect its content with a program like Notepad, rename it by removing the ending '.txt' and then 'double click' on the file to update your registry.
Below are instructions to use REGEDIT. This is a little primitive and be careful.
- Right click on the Start Menu > Run
- Type regedit and presss Enter
- Navigate to the folders: HKEY_CURRENT_USER > SOFTWARE > Microsoft > Office
Here, you must select the numbered folder which matches the installed version of Microsoft Office. Office 2016 and Office 365 use the value 16.0. Office 2013 is 15.0. Office 2010 is 14.0. - After selecting the appropriate Office version’s folder, Navigate to the folders: Common > Signatures.
Summary: HKEY_CURRENT_USER\SOFTWARE\Microsoft\Office\16.0\Common\Signatures - Right Click the white-space on the right side and choose New > DWORD
Name it XadESLevel. Right click and "modify" to enter a value of 2. This configures Microsoft Office behavior as "preferring" a timestamp be created with each digital signature.
- (Optional) Create another DWORD and this time title it MinXAdESLevel. Right click and "modify" to enter a value of 1 or the more strict 2.
The value of 1 configures Microsoft Office so that if the timestamp service is not available then proceed with creating a digital signature without a timestamp (that is the default value if you do not create this entry). The value of 2 stops the process until you have timestamp server access. For your initial testing we recommend setting this to 2 so Office will alert you if there are problems with timestamp server access.
- Create a String Value and title it TSALocation. Right click and "modify" to enter a value of one of the URLs below.
- TEST: http://tsatest.digistamp.com/ipauth
- PRODUCTION: http://tsa.digistamp.com/ipauth
Check that your results look like this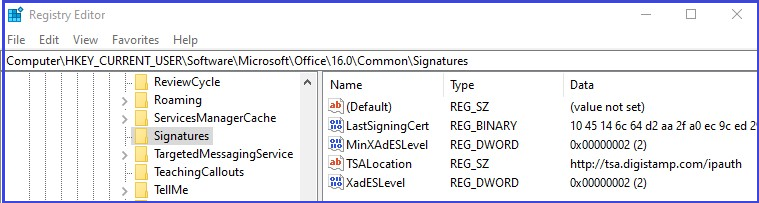
Setup: Import DigiStamp Root certificates
You have 2 decisions
1. Which of the 3 encryption algorithms are you going to use. We suggest the use of ECC-NIST. There is more information here. Your DigiStamp account setting were setup to use ECC-NIST and if choose otherwise then you need to make a change to that setting. Change your DigiStamp account setting here for Test environment and here for Production, at the bottom of the page see "timestamp type".
2. Are you creating timestamps in our TEST environment or are you creating final quality production timestamps?
Based on the above 2 decisions, find the vertical-column of public key certificates that you will need. Download them so we can install them in the next step.
| Production | Test / Evaluation | ||||||||
| ECC NIST | ECC BP | RSA | ECC NIST | ECC BP | RSA | ||||
| Root | root.NIST | root.BP | root.RSA | root.test.NIST | root.test.BP | root.test.RSA | |||
| Audit | audit.NIST | audit.BP | audit.RSA | audit.test.NIST | audit.test.BP | audit.test.RSA | |||
| Audit | audit.NIST | audit.BP | audit.RSA | audit.test.NIST | audit.test.BP | audit.test.RSA | |||
| Audit | audit.NIST | audit.BP | audit.RSA |
Details: about the DigiStamp x.509 certificates and how they are organized. Minor note, it is a quirk of Microsoft Office that we need to install the “audit” certificates. Compared to Adobe products that need only the single root certificate.
Next we install the DigiStamp Public Key Certificates that you downloaded above.
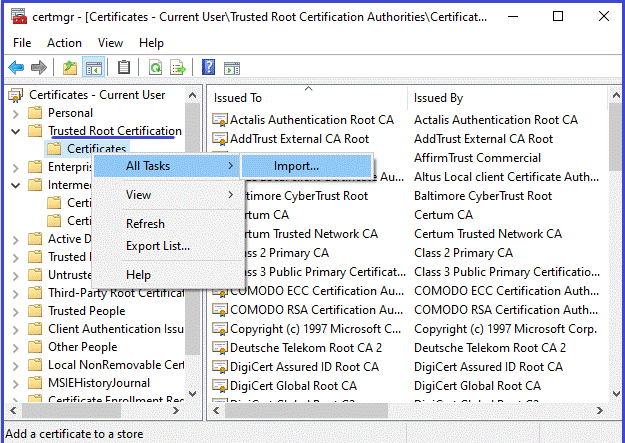
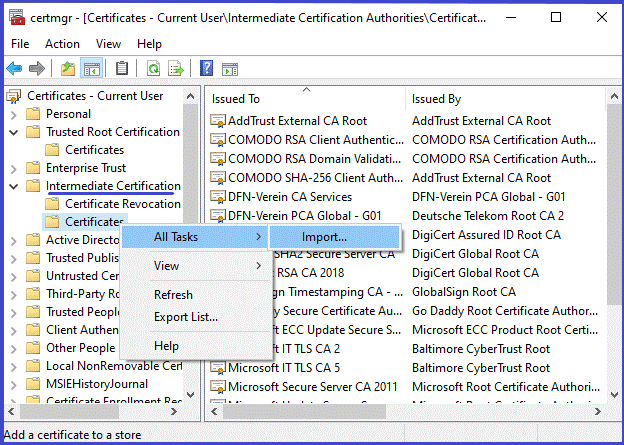
- Right click on the Start Menu > Run certmgr.msc
- Type certmgr.msc and press Enter
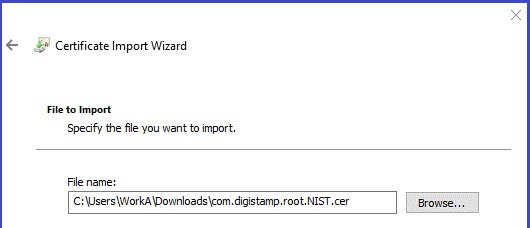
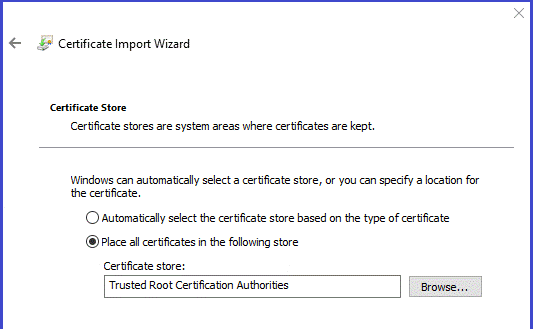
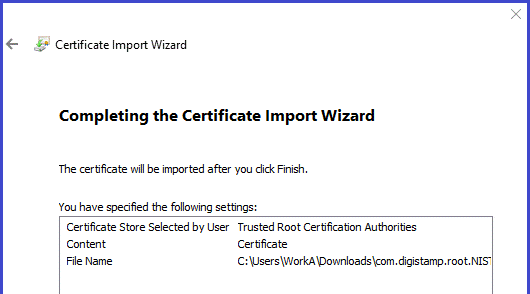
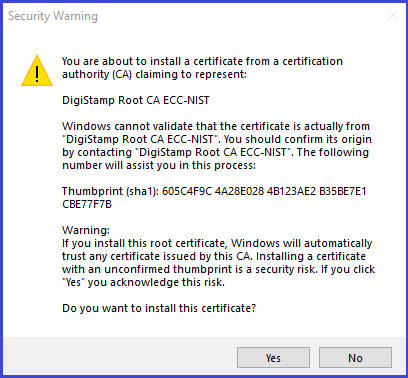
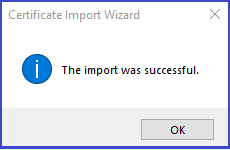
- Import root certificate, it will be in a file with a name containing “root” into folder "Trusted Root Certificate Authority".
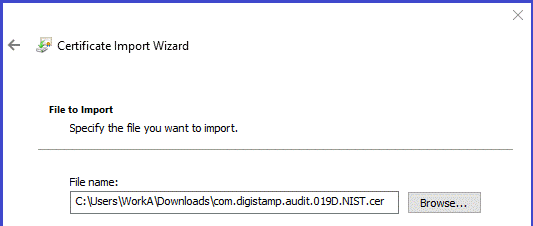
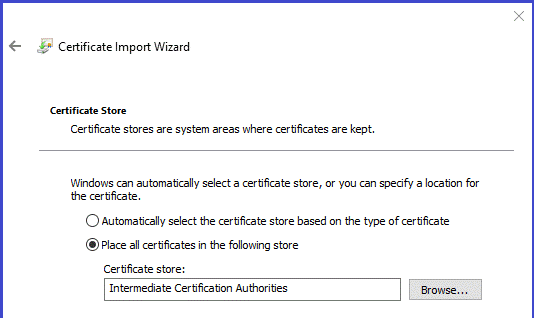
- The audit certificates will be in files with a name containing “audit”. They are imported into folder "Intermediate Certificate Authority". You will need to do this 3 times, once for each Audit certificate.
Setup: tell DigiStamp your IP address so we know it's you
Microsoft Office timestamping does not include any authentication mechanisms. So, DigiStamp does not know if it is you that is requesting the timestamp. The solution is in your DigiStamp account setup: login to your DigiStamp account and enable DigiStamp's IP-based Authentication option here toward the bottom of the page, it's easy. This records your Internet Global IP address to identify your requests. This IP address will change with different Internet connections, so you may need to return to your account settings to update this value.